Overview
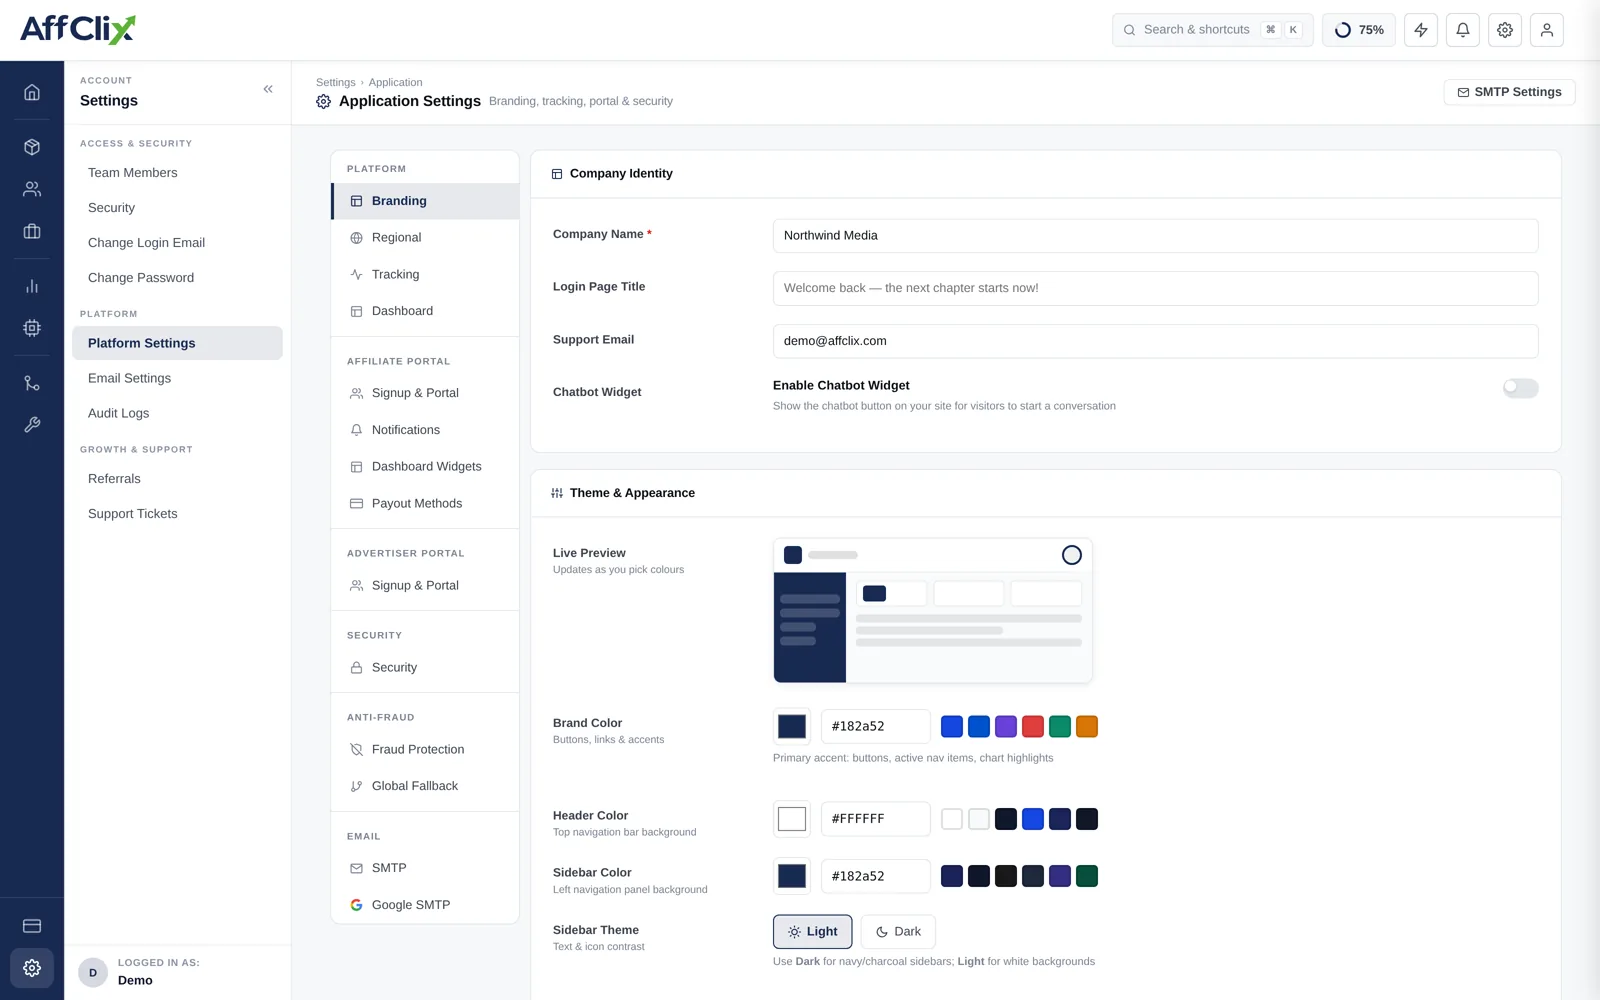
The Branding & Application Settings page (Settings → Platform Settings) is organised into sections. Each tab groups related settings and has its own Save button — changes to one tab do not affect others until you explicitly save.
Tabs available:
- Theme & Appearance — Brand colour, dark/light mode
- Company Identity — Network name, login page, support contact
- Regional — Timezone, date format, currency
- Affiliate Portal — Signup mode, terms, privacy URL
- Advertiser Portal — Signup mode for advertisers
- SMTP — Custom mail server configuration
Colour and appearance changes are reflected immediately in the preview panel on the right side of the Theme tab — before you save. You can safely experiment with colours without committing until you click Save.
Theme & Appearance
AffClix uses CSS custom properties (CSS variables) for all branded colours. Changing the brand colour here rewrites a single CSS variable that cascades through buttons, links, sidebar highlights, badge colours, and all interactive elements across the entire platform.
| Setting | Description |
|---|---|
| Brand Colour | Primary colour used for buttons, links, active sidebar items, and call-to-action elements. Accepts any valid hex colour. The colour picker shows a live browser-chrome preview. |
| Default Mode | Sets the default colour scheme for all users: Light, Dark, or System (follows the user's OS preference). Individual users can override this in their personal Profile settings. |
| Favicon | Upload a 32×32 or 64×64 PNG/ICO file. Displayed in browser tabs and bookmarks. Must be under 100 KB. |
| Logo (Light Mode) | PNG or SVG displayed in the sidebar and email headers when the platform is in light mode. Recommended dimensions: max 180×48 px, transparent background. |
| Logo (Dark Mode) | Separate logo asset displayed when dark mode is active. Use a version with a light/white foreground for legibility on dark backgrounds. |
The preview panel on the right updates instantly as you move the colour picker — powered by a real-time CSS custom property update on the preview iframe. What you see in the preview is exactly what your users will see after saving.
Company Identity
These settings control the text that represents your network in browser tabs, emails, and the login page.
| Setting | Where It Appears | Notes |
|---|---|---|
| Network Name | Browser tab title, all transactional emails (From name), login page headline, sidebar footer | Max 60 characters. Avoid special characters that may break email From headers. |
| Login Page Headline | The H1 text on the affiliate and advertiser login pages | Defaults to "Welcome to [Network Name]". Customise for a branded login experience. |
| Login Page Subtext | Subtitle below the headline on the login page | Optional. Good place for a short value proposition or network description. |
| Support Email | Reply-to address on all outgoing platform emails; shown in the affiliate dashboard footer | Must be a valid email address. Does not need to match your SMTP from address. |
| Support URL | Link in the affiliate dashboard "Contact Support" button | Can be a mailto: link, Zendesk URL, or any support portal. |
Regional Settings
Regional settings define how dates, times, and numbers are displayed across the platform.
| Setting | Impact |
|---|---|
| Timezone | All ClickHouse timestamps in reports are displayed in this timezone. Invoice dates, scheduled campaign start/end times, and cron job windows all use this timezone. Changing it retroactively changes how existing data appears — no data is modified, only the display offset. |
| Date Format | How dates are shown in tables and reports: MM/DD/YYYY, DD/MM/YYYY, or YYYY-MM-DD. |
| Default Currency | Default currency pre-selected when creating new campaigns. Does not convert existing revenue — only affects new campaign defaults. |
If you change your network timezone after data has been collected, historical reports will shift by the offset difference. Discuss with your team before changing timezone on a live network.
Affiliate Portal & Advertiser Portal
Both portal tabs (Affiliate and Advertiser) offer the same set of controls independently:
| Setting | Description |
|---|---|
| Signup Mode |
|
| Terms of Service URL | Linked in the signup form's "I agree to Terms" checkbox. Required for Open and Manual signup modes. Must be a publicly accessible URL. |
| Privacy Policy URL | Linked alongside the Terms of Service URL in the signup form. |
| Welcome Email | Toggle whether a welcome email is sent automatically when a new affiliate/advertiser account becomes Active. Email content is managed in Settings → Email Settings. |
SMTP Configuration
By default, all platform emails (welcome emails, password resets, invoice notifications, postback alerts) are sent via the shared AffClix mailer. You can replace this with your own mail server to ensure emails arrive from your own domain and From address.
| Field | Description |
|---|---|
| SMTP Host | Your mail server hostname. Examples: smtp.gmail.com, smtp.zoho.com, smtp.office365.com, or your own SMTP relay. |
| SMTP Port | Standard ports: 587 (STARTTLS, recommended), 465 (SSL/TLS), 25 (plain — not recommended). |
| Encryption | TLS (STARTTLS on port 587) or SSL (port 465). Match to your SMTP provider's requirements. |
| Username | SMTP authentication username — usually the full sender email address. |
| Password / App Password | SMTP authentication password. For Gmail and Microsoft 365, use an App Password if 2FA is enabled on the account. |
| From Name | The "From" display name shown in email clients. Defaults to your Network Name. |
| From Email | The "From" email address. Must be authorised to send from your SMTP server. Configure SPF and DKIM for best deliverability. |
After entering your SMTP credentials, click Send Test Email to verify the configuration before saving. A test message will be sent to your admin account's email address.
For step-by-step guides for Gmail, Zoho, and Microsoft 365 SMTP configuration, see the SMTP documentation section.