Before You Begin
You need an advertiser record and the advertiser's destination URL. If the advertiser field is empty, create the advertiser first — see Create an Advertiser.
Go to Campaigns → Create Campaign, or press New Campaign from the campaign list.
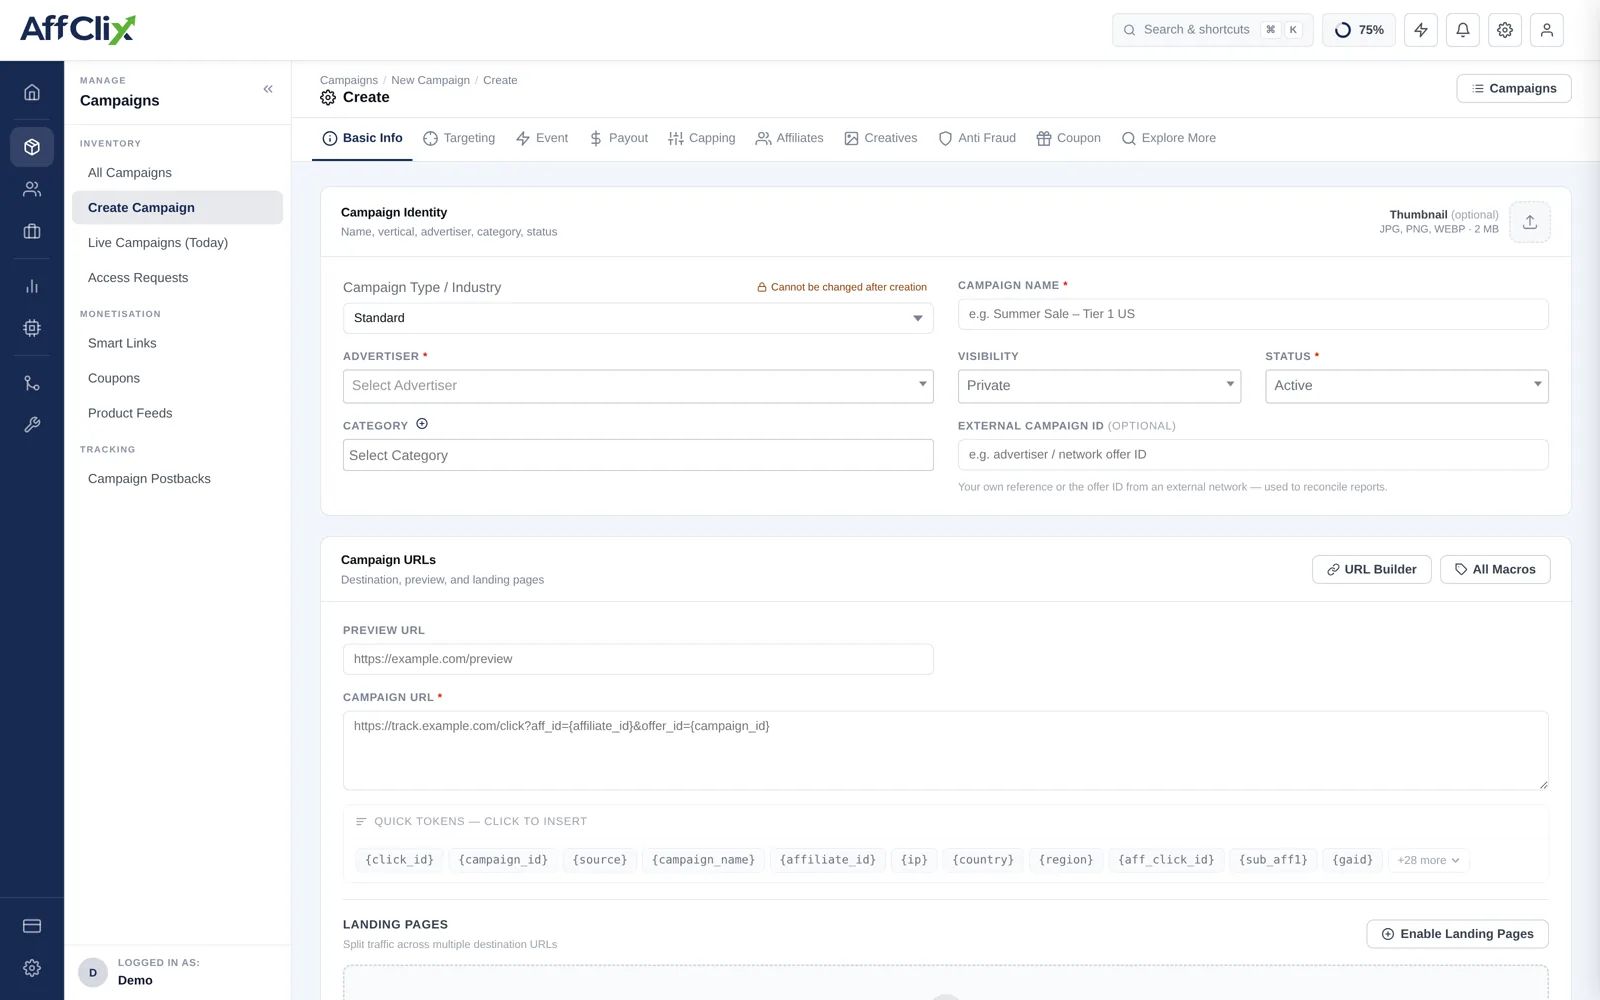
Targeting, Event, Payout, Capping, Affiliates, Creatives, Anti Fraud and Coupon all attach rows to a campaign ID that does not exist yet. Save with the URL and pricing correct, then configure them in that order.
1. Campaign Identity
Name, vertical, advertiser, category and status.
| Field | Required | Notes |
|---|---|---|
| Campaign Type / Industry | Optional | Standard, iGaming, Crypto / DeFi, Forex / CFD, or Lead Generation. Cannot be changed after creation — it selects the vertical rule set applied to traffic. See Campaign Types. |
| Campaign Name | Required | Visible to affiliates. Include the geo and model so it reads at a glance, e.g. ShopMax US — CPS Tier-1. |
| Advertiser | Required | Who is paying. Drives advertiser reporting and invoicing. |
| Visibility | Required | Public — any approved affiliate can run it immediately. Public + Require Approval — listed, but each affiliate must request access. Private — hidden; you add affiliates manually. |
| Status | Required | Active, Pending or Ended. Leave on Pending while the deal is still being agreed. |
| Category | Optional | Groups campaigns for affiliate browsing and reporting filters. |
| External Campaign ID | Optional | The advertiser's own offer ID. Keep this filled — it is what lets you reconcile their reports against yours. |
| Thumbnail | Optional | JPG, PNG or WEBP up to 2 MB. Shown in the affiliate campaign browser. |
The vertical decides which settlement and compliance rules apply to the traffic. Changing it later would re-price conversions that have already been recorded, so the field is locked once the campaign exists. If you pick the wrong one, create a replacement campaign.
2. Campaign URLs
The campaign URL is the advertiser destination plus the tracking tokens that have to survive the redirect. This is the field that most often breaks attribution, so it is worth being careful with.
| Field | Purpose |
|---|---|
| Preview URL | An untracked link affiliates can open to see the offer page. Not used for live traffic. |
| Campaign URL | The live destination. Every click is redirected here with tokens substituted. |
A typical campaign URL looks like this:
https://advertiser.example.com/landing?utm_source=affclix&cid={click_id}&aff={affiliate_id}&geo={country}{click_id} nothing can be attributedThe click ID is what the advertiser hands back on the postback to tell you which click converted. If it is not in the campaign URL, the advertiser has nothing to return, and every conversion will arrive unattributed. This is the single most common cause of a campaign that records clicks but never conversions.
Two helpers on this block
- URL Builder — pick the advertiser's platform (Trackier, Tune / HasOffers, Affise, Everflow, Impact, CJ, Awin, AppsFlyer, Adjust and about 30 others) and paste their raw URL. The correct tracking parameters for that platform are appended automatically. Leave it on Auto-detect and it will infer from the URL.
- All Macros — the full token list with descriptions, click-to-insert at your cursor. Quick Tokens below the field covers the common ones inline. See the Macro Reference for all of them.
3. Landing Pages
Off by default. Press Enable Landing Pages to split traffic across several destinations — useful for A/B tests and for advertisers who run different creatives per geo. Each entry takes a name, a URL and a weight that controls its share of traffic.
Covered in full in Landing Pages.
4. Pricing and Schedule
Revenue model, payout, currency, dates and time targeting.
| Field | Notes |
|---|---|
| Currency | Applies to both revenue and payout. Reports convert to your network currency for totals. |
| Payment Model / Objective | CPA, CPL, CPI, CPS, CPC, RevShare and others. Determines whether the amounts below are read as fixed sums or percentages. See Payment Models. |
| Revenue (advertiser pays) | What you invoice the advertiser per conversion. |
| Payout (affiliate earns) | What the affiliate is credited. Your margin is the difference. |
| Start / End date and time | Entered in UTC. Outside this window the campaign stops accepting clicks. |
| Timezone | The timezone daily caps and scheduling are evaluated against. |
| Enable Deep Link | Lets affiliates pass a destination path so traffic lands on a specific product page. |
| Enable Time Targeting | Restricts delivery to chosen hours and days — dayparting for offers with staffed call centres. |
Set payout above revenue and the campaign loses money on every conversion. If you are deliberately running negative margin, note it in the private note so the next person to open the campaign knows it was intentional.
The schedule fields are labelled UTC, while daily caps roll over at midnight in the campaign timezone. For an advertiser buying on local days, set the timezone to theirs so a daily cap does not reset mid-afternoon for them.
5. Campaign Content
| Field | Who sees it |
|---|---|
| Description | Affiliates. What the offer is, what converts, and what the advertiser will not accept. |
| Private Note | Your team only. Contract terms, contact names, negotiated rate history. |
| Campaign KPI / Terms | Affiliates. Quality expectations, allowed traffic sources, prohibited methods. |
Write the KPI field as if it were the contract, because in a dispute it is what you will point at. State allowed traffic types explicitly rather than listing only what is banned.
Press Create Campaign to save.
After You Save
The remaining tabs unlock. Work through them in this order:
Event
Attach your conversion events, set the validation window, and generate the advertiser postback URL.
Targeting and Capping
Restrict geo and device, then cap volume to what the advertiser agreed to buy. See Targeting Rules and Capping.
Payout Rules and Creatives
Add geo or affiliate specific pricing in Payout Rules, and upload assets in Creatives.
Affiliates
Approve access and build tracking URLs. See Manage Affiliates.
Test
Run the Link Tester, then fire a test conversion before handing the link out.
Troubleshooting
| Symptom | Likely cause |
|---|---|
| Advertiser dropdown is empty | No advertiser exists yet. Create one first. |
| Clicks recorded, conversions never arrive | {click_id} missing from the campaign URL, or the advertiser is not firing the postback. |
| Conversions arrive but are unattributed | The advertiser is returning the click ID in a different parameter than the postback expects. |
| Affiliates cannot see the campaign | Visibility is Private, or they have not been approved on the Affiliates tab. |
| Clicks are rejected immediately | Status is Pending or Ended, the schedule window has passed, or a targeting rule excludes the traffic. |